Can Beginners Use an Ab Roller Safely at Home?
Share
An ab roller can build serious core strength. It can also expose weak positioning fast. So, can beginners use an ab roller? Yes, but not by copying full rollouts on day one. Start with a shorter range, stable hips, and a progression that earns more distance over time.
Can Beginners Use an Ab Roller? Yes, With Regressions
The ab roller is not just an ab exercise. It challenges your entire front side. Your abs resist spinal extension while your shoulders, lats, hips, and glutes help control the rollout.
That is why beginners often feel it in the lower back first. The problem is usually not the roller itself. The problem is extending farther than the core can control.
A good beginner rollout feels like a moving plank. Your ribs stay down. Your pelvis stays slightly tucked. Your glutes stay active. The wheel moves only as far as you can hold those positions.
You do not need a long rollout to get results. A controlled six-inch rollout beats a shaky three-foot rollout every time.
Check the Ab Roller Before You Train
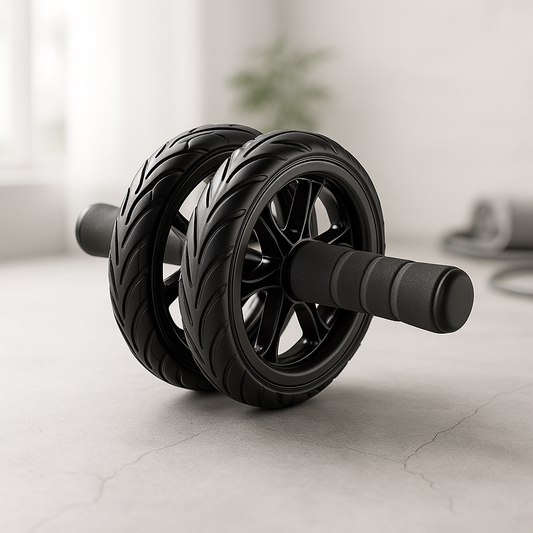
An ab roller is compact, but its stability matters. A wider wheel often feels steadier for new users. A narrow wheel demands more side-to-side control. That can be useful later, but it adds difficulty early on.
Physical specifications vary by model. Never assume that one roller's dimensions or load rating applies to another. Confirm the exact listing details before buying or training.
- Footprint dimensions: Folded footprint is usually not applicable. Check the exact wheel width, handle width, and total length for the model. Also allow clear floor space in front of you for your rollout range.
- Weight capacity: Use only the manufacturer's stated maximum user weight. Do not guess based on appearance or use a roller with no listed capacity.
- Resistance type / motor horsepower: Manual bodyweight resistance. No motor. Motor horsepower is not applicable.
- Noise level assessment: Usually apartment-friendly. The wheel makes low rolling noise on a mat or rug. Hard floors may create more sound and vibration.
Start With the Right Setup
Set up on a flat surface with enough room ahead of you. Keep pets, furniture, and loose rugs out of the rollout path. Your knees should feel supported, not numb or painful.
Start on both knees. Grip the handles firmly, but do not crush them. Place the wheel directly below your shoulders. Before rolling forward, squeeze your glutes and gently pull your ribs down.
Think about creating one long line from your shoulders to your knees. Your hips should not sag toward the floor. They also should not shoot backward as you return.
Use this simple cue: move the wheel with your shoulders, not your lower back.
Your First Rep
Roll forward only a few inches. Pause for one second. Then pull the wheel back by tightening your abs and pressing your hands into the handles.
Your arms will stay fairly straight. The goal is not to curl the roller back with your biceps. Your core should create the control.
Stop the rep immediately if you notice either of these signs: your back begins to arch or you cannot return smoothly. Both mean the range is too long for now.
The Best Beginner Ab Roller Progression
Progression matters more than motivation here. A full rollout is not the starting line. It is a later skill.
Phase 1: High-Position Rollouts
Use a wall in front of the wheel. Start close enough that the wall stops the roller after a short rollout. This gives you a physical limit and removes the fear of falling forward.
Complete 2 to 3 sets of 5 to 8 slow reps. Keep each rep smooth. Move your knees slightly farther from the wall only when your form stays solid.
Phase 2: Short Kneeling Rollouts
Move away from the wall. Roll out a small distance, then return. Keep the range deliberately conservative.
Train 2 or 3 times weekly. Perform 3 sets of 6 to 10 controlled reps. Rest about 60 to 90 seconds between sets. Quality matters more than fatigue.
Phase 3: Longer Kneeling Rollouts
Add distance gradually. A practical marker is one or two inches farther every week or two. Increase range only after you can complete every rep without back discomfort.
At this stage, 3 sets of 8 to 12 reps is plenty. More volume is not always better. The exercise becomes harder quickly as the wheel moves farther forward.
Phase 4: Advanced Variations
Standing rollouts, single-arm rollouts, and narrow-wheel training are advanced options. They require far more trunk strength and shoulder control. Most beginners do not need them for months.
Build a strong kneeling rollout first. Consistency will take you farther than rushing toward the hardest variation.
Common Mistakes That Make Rollouts Feel Bad
The biggest mistake is treating the ab roller like a test. It is a strength tool. Use it with the same patience you would use for a loaded squat or push-up.
Letting the hips drop. This shifts stress into the lower back. Squeeze your glutes before each rollout and shorten the distance.
Holding your breath. A brief exhale as you roll forward can help keep your ribs down. Take another breath before returning.
Rolling too far. The wheel can travel farther than your core can control. Set the range based on form, not ambition.
Moving too fast. Fast reps hide weak positions. Use a slow three-second rollout and a controlled return.
Training through joint pain. Mild abdominal effort is expected. Sharp wrist, shoulder, knee, or back pain is not. Stop and reassess your setup.
Build the Strength That Makes Rollouts Easier
Ab rollers work best within a balanced routine. If the movement feels overwhelming, build your base with planks, dead bugs, glute bridges, and incline push-ups. These drills teach bracing, pelvic control, and shoulder stability.
You can also use a shorter ab roller range after your main workout. Your body is already warm, and the roller becomes a focused core finisher. Keep the dose modest. Two strong sets are more useful than five sloppy sets.
Recovery matters too. Tight hip flexors or sore shoulders can change your rollout position. Spend a few minutes on gentle hip and upper-back mobility after training. Virfit's approach is simple: train smarter, recover better, and keep showing up.
Who Should Wait Before Using an Ab Roller?
Beginners with no exercise background can still start with wall-limited kneeling reps. However, some people should get professional guidance first.
Pause and speak with a qualified clinician or physical therapist if you have a recent back injury, active shoulder pain, wrist limitations, a hernia, or postpartum core concerns. The ab roller creates a strong demand on the trunk. It is not the right first choice during every stage of recovery.
If your knees hurt, add more cushioning and reduce volume. If your wrists hurt, check handle comfort and avoid forcing a deep wrist angle. If your lower back hurts, decrease the rollout range immediately. Do not try to “push through” that signal.
How to Choose an Ab Roller for Beginner Training
Use this checklist before adding an ab roller to your home setup:
- Confirm a published weight capacity that exceeds your body weight.
- Choose a stable wheel width that matches your current balance level.
- Check handle grip, comfort, and secure construction.
- Measure your open floor space, including rollout room ahead.
- Use a mat if you train on hard floors or live upstairs.
- Pick a model that rolls smoothly without wobbling or sticking.
- Choose durability over gimmicks. Simple, stable equipment gets used more often.