Best Core Exercises With Ab Roller
Share
Most people use an ab roller for one move, flare up their lower back, and quit. That is the problem. The fix is learning the right core exercises with ab roller progressions, plus choosing a model that fits your space, strength, and training style.
Why core exercises with ab roller work
An ab roller looks simple. It is not. A good rollout trains anti-extension, which means your core resists your lower back from arching as your body moves forward. That is a big reason it feels harder than crunches.
You also get more than ab work. Your lats, shoulders, glutes, and deep trunk muscles all help. Done well, the movement builds strength that carries into push-ups, pull-ups, carries, and lifting. Done poorly, it turns into a hip flexor tug-of-war.
That trade-off matters. The ab roller is effective, but only when progression matches control.
Top ab roller types for home training
Single-wheel ab roller
This is the most compact option. It works well for small apartments, bedroom gyms, and quick sessions between meetings.
- Footprint Dimensions: approx. 7-8 in wheel diameter, 10-12 in handle width; folded: typically not foldable, stores in a small drawer or shelf space
- Weight Capacity: commonly 220-300 lb
- Resistance Type / Motor Horsepower: bodyweight resistance, no motor
- Noise Level Assessment: low to moderate; quiet on mats, louder on tile or hardwood
The catch is stability. A narrow wheel asks more from your balance. That can be useful later, but true beginners may shake too much to learn the movement cleanly.
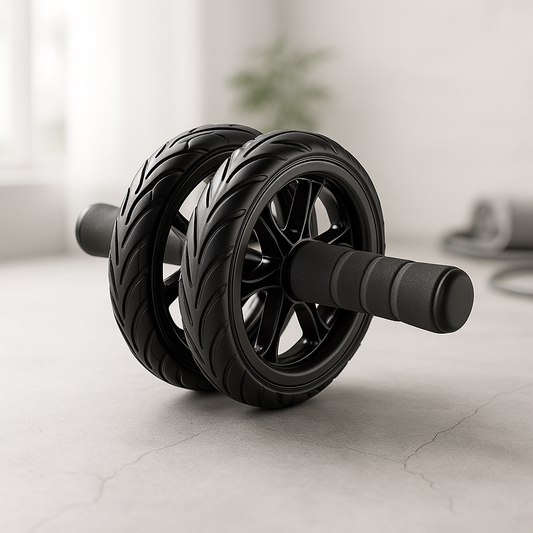
Dual-wheel ab roller
A dual-wheel model gives you a wider base. That means less wobble and a smoother track forward and back.
- Footprint Dimensions: approx. 7-8 in wheel diameter, 11-14 in total width; folded: usually fixed frame, easy vertical storage
- Weight Capacity: commonly 250-330 lb
- Resistance Type / Motor Horsepower: bodyweight resistance, no motor
- Noise Level Assessment: low; generally quieter and smoother than single-wheel models on hard floors
For most home users, this is the safest starting point. You still need tension and control, but you spend less energy fighting side-to-side drift.
Ab roller with resistance spring
Some models add internal spring assistance. That helps on the return phase, where many users collapse or yank with the hips.
- Footprint Dimensions: approx. 7-9 in wheel diameter, 12-16 in width; folded: fixed body, moderate shelf footprint
- Weight Capacity: commonly 220-300 lb
- Resistance Type / Motor Horsepower: bodyweight resistance with spring assist, no motor
- Noise Level Assessment: low to moderate; spring mechanism can add slight mechanical sound
This style can be a smart bridge for beginners. It should not replace tension. It should help you groove better mechanics.
Ab roller with knee pad set
The wheel may be standard, but the included knee pad matters more than people think. Hard floors ruin consistency fast.
- Footprint Dimensions: wheel approx. 7-8 in diameter, 11-14 in width; knee pad often 13-15 in long; folded: pad stores flat
- Weight Capacity: commonly 220-330 lb
- Resistance Type / Motor Horsepower: bodyweight resistance, no motor
- Noise Level Assessment: low; pad reduces impact and rolling vibration on upstairs floors
If you train in an apartment or on hardwood, this setup makes sense. Less noise. Less knee pressure. Fewer excuses.
The best core exercises with ab roller for each level
1. Plank hold on the ab roller
This is where many people should start. Place both hands on the handles and hold a high plank. The roller may shift slightly, which forces your core to brace.
Keep ribs down, glutes tight, and neck neutral. If your lower back sags, shorten the hold.
2. Wall rollout
Face a wall while kneeling. Roll forward until the wheel touches the wall, then return. The wall limits range, which helps you own position.
This is one of the best beginner progressions. You control depth without guessing.
3. Partial kneeling rollout
Kneel on a pad and roll only as far as you can without losing spinal position. That distance might be short. That is fine.
The goal is quality. Reach forward from the shoulders while keeping the hips from dumping down.
4. Full kneeling rollout
Once partial reps feel smooth, increase range. Roll out farther, pause briefly, then return under control.
This is the bread-and-butter move for most users. It builds real trunk strength without the jump to standing too early.
5. Tempo rollout
Slow the lowering phase to three or four seconds. Pause. Then come back smoothly. Less speed means more tension and less cheating.
This variation is excellent if standard kneeling reps feel too easy but standing reps are still out of reach.
6. Diagonal rollout
Instead of rolling straight ahead, roll slightly to the left, then right. This challenges obliques and anti-rotation control.
Use a shorter range at first. The side angle increases the demand fast.
7. Single-arm assisted rollout
Use one hand on the roller and the other lightly on a bench, box, or wall for balance. This is an advanced stability drill, not a party trick.
If your hips twist, regress. Rotation should be resisted, not exaggerated.
8. Standing rollout
This is the advanced benchmark. Start standing, hinge down, place the wheel on the floor, and roll forward while keeping tension from ribs to pelvis.
Very few people need this right away. It is impressive, but it also exposes weak control fast. Earn it through clean kneeling work first.
Form cues that make the ab roller safer and harder
Think about making your body one moving unit. Squeeze your glutes before every rep. Tuck the ribs slightly so the chest does not flare. Push the floor away through the handles.
Your hips should travel with your torso. If they stay high, you turn the rollout into a shoulder drill. If they sag low, your lower back takes the hit. Neither is the goal.
Breathing helps. Inhale before the rollout. Exhale as you return and brace harder through the middle.
Common mistakes that stall progress
The first mistake is going too far too soon. Range of motion is not the win. Controlled range is. Stop the rep before your lower back arches.
The second mistake is rushing the return. Many users collapse forward, then yank back with the hips. That misses the strongest part of the training effect.
The third mistake is using the ab roller too often. Two or three sessions a week is enough for most people. Your trunk needs recovery like any other muscle group.
A simple weekly plan that fits real life
If you are new, do two sessions weekly. Start with plank holds and wall rollouts. Add 2-3 sets of 6-8 controlled reps.
If you are intermediate, train three times weekly. Use full kneeling rollouts, tempo reps, and diagonal work. Keep total quality reps between 18 and 30 per session.
If space is tight or neighbors are below you, train on a mat and move slowly. Fast rollouts create more wheel chatter. Smooth reps stay quieter and feel better on joints.
How to choose the right ab roller
Use this buyer's guide checklist before you order:
- Choose dual-wheel stability if you are a beginner.
- Choose a compact single-wheel model if storage is your top issue.
- Choose spring assistance if you need help learning the return.
- Choose a set with a thick knee pad for hardwood or apartment use.
- Check weight capacity above your bodyweight for a safer margin.
- Look for non-slip handles if your hands sweat.
- Prioritize low-noise wheels if you train early or upstairs.
- Keep the footprint small if your workout area doubles as living space.
Virfit customers usually do best with gear that is easy to use consistently, not gear that looks advanced on day one. Built for performance also means built for real life.
The best ab roller is the one you will use three months from now, with clean reps, steady progress, and no dread before the first rollout. Start where you can control the movement, and let strength catch up.